Thursday, March 27, 2014

Our "Five Year House" Five Years Later

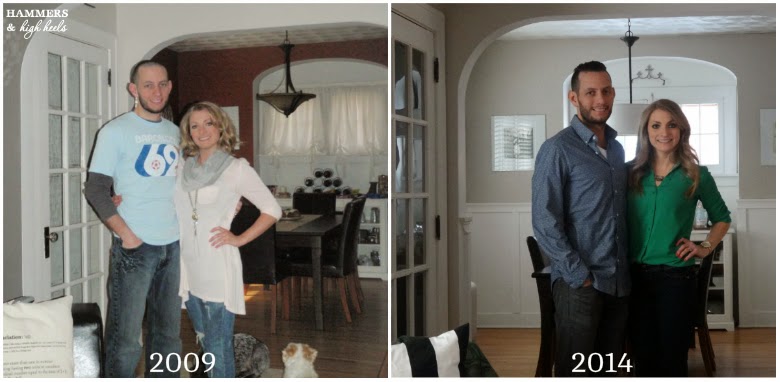
On March 27th 2009, exactly five years ago today, Alex and I walked through our front door for the very first time as homeowners.   It wasn't the magical day I thought it would be (you can read about that story & tears here) and funny enough, things didn't really end up how we had pictured five years later either.  We always thought this house would be a "Five Year House"  but as you can see/read we're still here kickin' it in our old (but totally refreshed) little Dutch Colonial and unlike March 27th 2009, this time, on this day I'm glad things did NOT turn out the way we thought they would.  Our house became so much more than a "Five Year House" for us.

I have no idea if we'll be here for another five years, or one year, or maybe we'll be here for forty years?  Yikes, can you imagine how many times I will have repainted the dining room in 40 years?!  (shutter) I just know that today that I can't imagine parting with it and if we ever do, a part of me will feel heartbroken over it.  This is the first place we made into a real home on our own and it will always hold a very special place in my heart.

Who knows where we'll be five years from today on March 27th, 2019 , I can only assume it will be different than what I'm expecting it will be like today.  I just really hope crying at the top of our stairs again isn't a possibility, that was a real downer :)

How about you?
Have you been in your house longer than you ever expected to be?
What ended up being your perfect/favorite home and why?

What a journey it's been inside these walls!  Cheers to the 5th year!  

Saturday, March 22, 2014

Zippered Clutch / Carry-All with Handle Strap Tutorial

Since I'm still waiting on the new kitchen rugs I ordered earlier this week, I decided to keep busy with a few sewing projects I've been thinking about for a while.  First up, a new take on my Versatile Zippered Clutch DIY  (check it out if you missed it!).  This time, I increased the size and added a handle strap making it perfect for carrying a laptop alone or with a whole-lotta other stuff inside!

Totally beats using a boring laptop case right?!

Onto the tutorial!  One thing to note, I constructed this clutch a bit differently than I did in my first clutch DIY and I think this version is a wee bit easier for constructing the basic zippered clutch part so even if you aren't attaching a handle strap you can still follow this too!

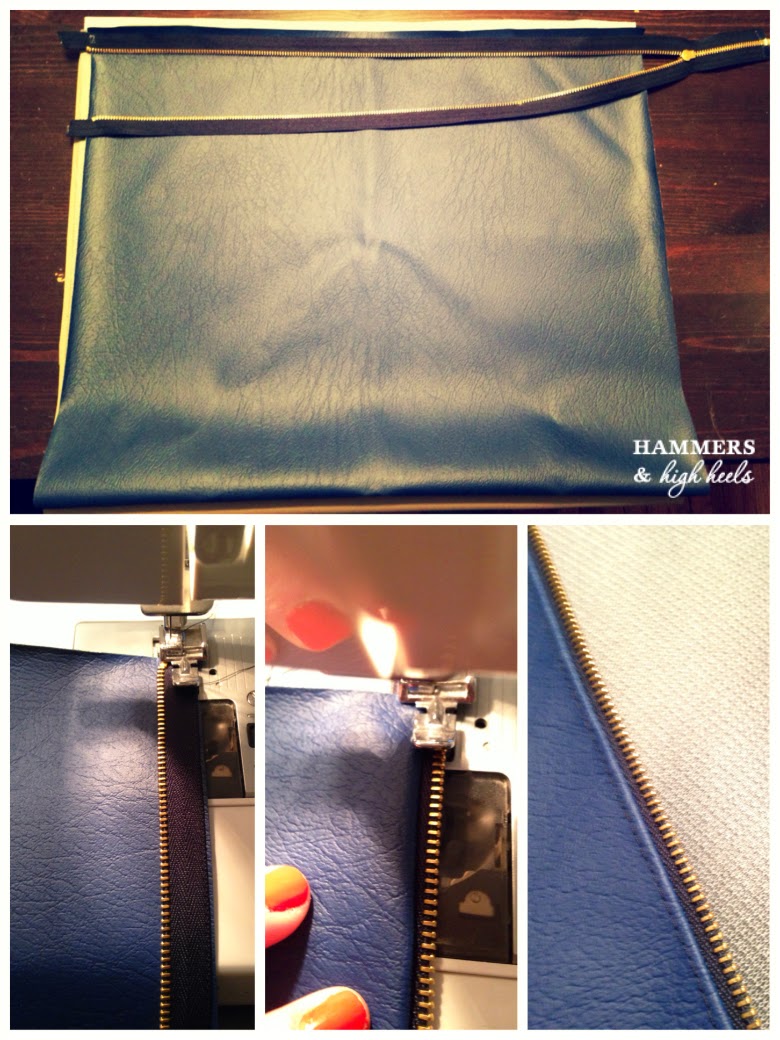
First, cut a single piece of fabric to make the clutch (fabric will fold in half).  I based my measurements off of the size of my laptop so I cut a piece measuring 26.0" L x 16.0".  Once the fabric is ready, fold it in half (exterior fabric out as shown below) and pin the zipper on the top edge.
With the zipper pinned in place on each side, it's time to stitch in place.  To do this and get a clean finished top edge, first stitch the zipper with the metal portion of the zipper facing the fold/bottom of the clutch (left photo above).  When that line of stitching is complete, flip the zipper/top edge over so the zipper teeth no longer face the fold/bottom (middle photo above).  Then do another clean line of stitching, this will give you a nicely finished top edge where the zipper attaches to the bag (right photo above).

After the zipper is attached to both sides of the top edge, fold the bag in half with the interior of the bag showing (left photo below), pin the fabric together and stitch both side edges of the bag.
Once both sides of the bag are sewn together, turn the bag right-side out.  Woo-hoo you have the clutch complete!

Now, let's add the handle strap.  Start by cutting a single piece of fabric to make your handle (you will fold in half like the bag).  I cut my handle to 7.75" L x 3.5" W, so the completed handle would measure 7.75" L x 1.5" W.  The tricky part is that you will fold the fabric, but not in half.  Fold it so you get the width you want and have 0.5" excess (see right photo below).  You will stitch along the folded edge and then fold the excess 0.5" over the raw edge and stitch in place (shown in middle photo below).
After you finish those steps, turn the handle over so the clean folded+stitched edges are facing up (right photo above).

Time for the final step!  Pin the handle wherever you'd like it to be placed on the front of the clutch and stitch in place.

That's it!!!!  Not too bad right?  
Pretty simple and makes for a much more stylish way to tote around a laptop!

What do you think?  Are you liking the new clutch DIY?
What other cute clutches or tote bags have you been seeing lately?  
What style I should DIY next?!?!

I've pinned a few clutches and tote bags I want to try sewing next, who knows maybe I'll have another tutorial for you tomorrow?!  Heck I'll still be waiting for my rugs, oh the torture!!!

Wednesday, March 19, 2014

My Stylish Kitchen Rug Scores!

Since completing the new paint job in our kitchen, I've been DYING to take our new clean, simple, black+white look from stark to stylish with the right touches of decor.  First up on my shopping list was a new accent rug or two and after a couple evenings of online shopping I happily stumbled upon perfect options for our space!  I was so geeked that I kept squealing "eek!" throughout the duration of placing my order!   

Here are the two I pulled the 'submit order' trigger on-  both hand-knotted, all natural vegetable dyed, one-of-a-kind original Kazak designed rugs!

Why are they so perfect and why am I being a squealing nerd about them?
Simply put, they totally fit the antique Kilim style rugs from my inspiration board, but the prices did NOT!   SUPER SCORE!
When I began my search, I quickly felt very discouraged after finding so many beautiful "found" rugs that fit the look I wanted but they were all $250.00 or more even small accent rugs, many were in the $1,000+ range.  Don't get me wrong, I know they may fit that price tag due to the base materials or because they are vintage, but heck it's a gorgeous look that should be accessible in some way for everyone and I think I found a well-fitting authentic alternative!

Thankfully, it was the right keyword search that brought me to the rugs of my kitchen decor dreams!  Instead of searching kilim, over dyed, diamond woven, global, etc., I typed in "tribal rug" and boom!  Beautiful budget friendly options in the look I was looking for!
I know $99 & $72 it is still higher than the typical Ikea rug price I'm used to but after buying so many of those rugs that are now in our basement, I wanted to spend the money on something that I will likely want to display in our home for many years. And hey, if for some reason one or both don't work, I'm always able to return for a refund (hoping they are both worth keeping though!).

Ohhhh, I just can't wait to spice up this blank canvas of a kitchen!  Despite my victory the estimated delivery date is March 26th, boo!!!  That is the bad part of online shopping right?  I want it now!!!!
If only Veruca Salt knew the horrors of Standard Delivery service (shutter).   Who doesn't hate that part?  In the meantime, please help entertain me!  I'd love to hear what you think!

- Are you liking one of both of the Kazak rugs I found?
- What other decor would you add to make our new kitchen look stylish and complete?

**********
Note: In case anyone wondered, I was not contacted or offered any discount from Overstock.com for writing this post.  Had that been the case, I may have ordered a larger rug, LOL!  Veruca on the other hand did and invited me to a party with roomfuls of laughter and ten thousand tons of ice cream :)  

Friday, March 14, 2014

Finished with the Kitchen Re-Paint and Onto Decor!

We've finished up our kitchen re-paint project (woo-hoo)!  Now, there isn't a hint of red anywhere to be seen and it feels so refreshing!  Here's a look at how the new color shaped out from our dining room, into the kitchen, and ending with our kitchen nook.
Did you notice that Rocco sneaked into that bottom right photo?  Dude really loves photo bombing!
Below is a look back too so you can get a sense of the before and after action.  Our red wasn't bad or anything, we were just growing tired of it after five years.  The lighter (white/not white) Wheat Bread color contrasting with the darker (black/gray) Francesca color was exactly what we were looking for- something simple, clean, and a bit more modern  BUT...
Click here to see wood countertops & subway tile DIY or click here to see our original redo project
I have to admit that the new kitchen look is totally BEGGING for some new decor to give it some personality and style.       ***   It's looking a wee bit bare and empty right?   ****

So now it's onto my new kitchen challenge!  I've been on the search for some new decor and storage ideas to bring together the new look in our kitchen.  I guess it's kind of the fun part, well unless everything I want is crazy expensive?  But then it may lead to some extra DIY decor projects!

So here's what I'm thinking we need so far (visuals below):
Wall Art/Decor- Liking the clustered frames look, maybe above the archway to our kitchen nook?
Accent Rug(s)- We really need a hint of color and pattern, maybe a kilim look or stripes?
Storage- Mainly need above the fridge and in our nook, maybe baskets and then wall rails or shelves?
Images via My Hands Made ItMrs. JonesGoogy Dog,  Brigadeiro de Cholher,  MiCasa

*   What do you think?  *
Would you go with a kilim style rug?  Or the stripes?
What other ways would you add extra storage in a decorative way?  I'd love more ideas!

Please let me know if you have good suggestions for rug shopping or where to find the best kitchen storage bins/baskets.  I'm excited to get my shop on!

On that note, I'll close this one with another woo-hoo :)  Have a great weekend everybody!

Saturday, March 8, 2014

The Kitchen Colors Come Together

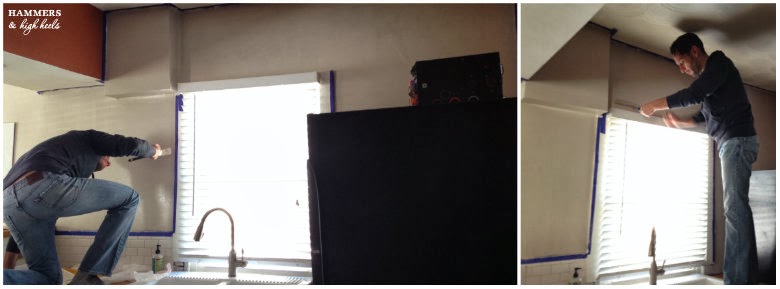
Things are coming along in our kitchen re-paint project!  It's not a finished look quite yet (we still have to paint that little back kitchen nook), but I was excited to show you where we landed with the whole kitchen color-combo decision!

Since we lived in that dark red/maroon color for 5 years, we found that there just wasn't a color we could agree to live in for however many more (no yellow, green, purple, pink, orange, red, etc. color families).  We also didn't want the whole space to be the white/not white Wheat Bread color for fear that it would look super washed out & bland dining room to kitchen.  So, we ended up going with an almost black paint color to contrast with the lighter tones - Martha Stewart's Francesca to be exact!
It's a blue based dark gray/black saturated color, perfect for creating a clean contrast with our white cabinets & subway tile.  Makes you think of black in a whole new light, right?!

If you're familiar with some of the previous posts from this project, you can see we pretty much stuck with black+white / dark+light type of look from the idea board from a couple weeks ago....
I'm hoping ours ends up with the same simple, clean, slightly modern type of look!  Regardless of that though, it's feeling a lot fresher without that dark red/maroon color for sure!  Painting (mainly the prepping/taping part) sure isn't fun or fast, but I love the new energy it brings to a space- especially one that we spend a lot of time in!  

Finishing up the kitchen nook paint is next then it's time for the more fun parts of the project, like updating the decor to complete the after look!  We're planning on painting the nook the Wheat Bread (white-ish color) since it is a small space, so now I have to ask you...

- For the kitchen nook, would you paint it the lighter Wheat Bread color or do something different?  
- If I do paint the nook Wheat Bread, should I paint the bottom half of the hutch Francesca to bring in some of the darker color?  How would you bring the darker color into the nook?

It's going to be a busy weekend for us but I'm excited to wrap this baby up!  Have a nice weekend everybody and get to bed early tomorrow, I know I hate losing that extra hour when we spring forward :)

Sunday, March 2, 2014

My Miserable Morning Errand Run

There are certain things you know you just shouldn't do during the weekend in the Twin Cities-   Example: visiting the Mall of America and/or Ikea.  You know it's going to be mobbed with misguided out-of-towners, Sponge Bob or some American Idol person clogging up traffic in the Rotunda, there won't be a place to park within a half mile, and the lines, ugh!!!!   Without a doubt, it will be misery. Pure. Sick. Misery.

So why I am telling you this?  Well, when I got up this morning I knew I had to head to get another gallon of paint for our kitchen project and thought, "hmmm, I should go to the Home Depot by Ikea so I can stop to get those new kitchen rugs and while I'm there I can run into the MOA to get couple returns done that have been sitting in my closet for a while."  

Yep I did it, I knew better but I did it and regretted it immediately upon seeing the line of traffic on the highway exit ramp.  Silly me for thinking that the -10 degree weather would scare off the crowds/out-of-towners but no, I was wrong, so very wrong.  By the time I got here it was too late to turn back.  I had come this far and I was determined to get my errand to-do list done.
I was prepared for awful parking but with the on-going construction situation between Ikea and the MOA, the options were even more limited.  I ended up finding a spot somewhere in Richfield (city north of Bloomington) I think?  With the subzero temps and MOA in the distance it was time for some cardio.  Tip for anyone planning a visit-  wear your heavy duty winter gear so you can make it from your car to the inside without risk of frostbite or a broken leg from running over sheets of ice :)
With my game face on I was ready to dodge the crowds... and by game face I mean my no make-up face (fun fact: I refer to that hat as my "no make-up disguise") LOL!  Not my best photo but I think it captures how cold I felt while going to & from the car.

Thankfully I lived to tell the tale after the whole ordeal and crossed off all those to-do's from my list including picking up extra paint for our kitchen repaint project!
We got a big chunk done but had to call it quits so we can catch some of the Oscars.  You might recall I dig some of that red carpet action :)

Any other local folks feel my pain when it comes to a MOA or Ikea visit?  
Will you be watching the red carpet & Oscar show?  Who are you rooting for?

We're going to have our own mini Oscar party now, maybe I'll share some pics and fashion thoughts in a bit?  I can't help myself :)